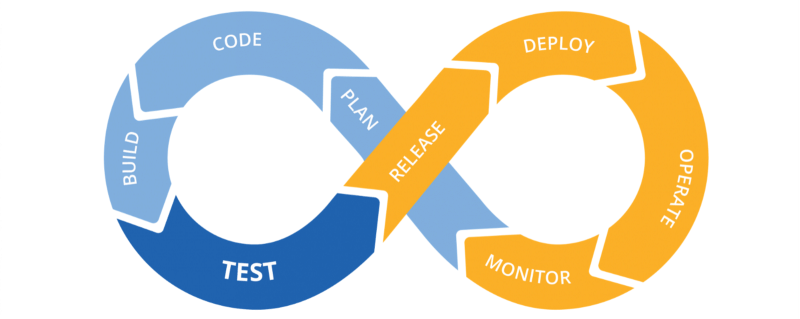
As a Software Engineer, major consideration has to be given to your development and deployment workflow in order to ensure coordination in development, seamless integration and effortless deployment. In an attempt to automate these processes efficiently, the following concepts were introduced:
- Continuous Integration
- Continuous Deployment/ Delivery
If this all seems foreign to you at this point, don’t get frightened by the technicality. In this article, we focus on explaining these concepts following a practical approach.
We will be setting up an auto-deploy method for our website hng.fun that can receive code via push and does the following:
- it will accept the push and
- test if the resulting site is working before accepting it. I.e it will run quick integrity tests and only when this is achieved will it allow the push to go through.
INTRODUCTION
First, let us take a look at the meaning of these concepts and shed some light on their relevance.
What is Continuous Integration?
Continuous Integration (CI) is the process of automating the build and testing of code every time a team member commits changes to version control. — Visual Studio Team
This basically describes a development workflow that allows a team of developers build software collaboratively, while automatically testing each code pushed to the code-base which is managed by a Version Control System(VCS) such as Git.
This is very handy when working with large teams and it facilitates working remotely. This also enables developers to push new features and updates to the production build.
What is Continuous Delivery & Deployment?
Continuous delivery is a series of practices designed to ensure that code can be rapidly and safely deployed to production by delivering every change to a production-like environment and ensuring business applications and services function as expected through rigorous automated testing.
Continuous deployment is the next step of continuous delivery: Every change that passes the automated tests is deployed to production automatically. –The Puppet Blog
Simply put code is automatically tested rigorously and is only deployed when it passes the tests. Hence, the production build(live deployment) is hardly compromised.
On the other hand, running a server without continuous integration and continuous deployment is all fun and games until your users are left without a live production site as your engineers rush to pull a backup image. Same goes for taking down your live production site into maintenance mode just to add a plugin, modifying the theme or changing a single file.
The better approach:
PREREQUISITES
In order to follow along through this guide, you should have the following:
- Basic knowledge of Linux and linux commands
- A server and want to automate the process of committing changes from Github to the server and adding Travis CI somewhere in between.
TOOLS & REQUIREMENTS
For this project we shall be making use of the following:
- A VPS Server.
- Travis CI
- The project files we are working with is https://github.com/HNGInternship/HNGFun. A PHP application that uses MySQL for its database.
About Travis CI:

Travis CI, the main tool we are making use of, does it all really. It integrates, tests and deploys by itself and does it all for free(i.e for only open source and public repositories) and integrates perfectly with Github our versioning platform.
Travis CI is a hosted, distributed continuous integration service used to build and test software projects hosted at GitHub.
SERVER SETUP:
We need to get our VPS server up and running, so we login into it using ssh
$ ssh root@localhostThen once logged in, we create a normal user using root:
//Add a user and give admin privilege
# adduser username
# usermod -aG sudo username
Then we login into our new account directly;
# su usernameor you can logout and relogin using the following command
# exit
$ ssh username@localhost
Then once that’s done, we setup our web server ‘Nginx’ and database ‘MySQL’ and PHPMyAdmin
$ sudo add-apt-repository ppa:ondrej/php
$ sudo apt-get update
$ sudo apt-get upgrade
$ sudo apt-get install php7.1   # for PHP 7.1
$ sudo apt-get install phpmyadmin nginx mysql
//To test that PHP Works
$ php -r 'echo "nnYour PHP installation is working fine.nnn";'
Setting up Nginx
After installing php and dependencies on server, SSL needs to be setup for nginx, to ensure web security. However, before setting up SSL, we need to ensure that HNGFun is accessible via the domain address hng.fun and www.hng.fun, hence the need to create configurations for HNGFun.
nginx configuration for HNGFun can be found at /etc/nginx/sites-available, with contents below.
# vim /etc/nginx/sites-available/hng.fun
------------------------------------------------------------------
server {
root /var/www/html;
index index.php index.html index.htm;
server_name hng.fun www.hng.fun;

location / {
try_files $uri $uri/ /index.php?$query_string;
}

location ~ .php$ {
include snippets/fastcgi-php.conf;
# Change php7.2 to the php version you have
fastcgi_pass unix:/run/php/php7.1-fpm.sock;
}

location ~ /.ht {
deny all;
}
listen [::]:443 ssl ipv6only=on; # managed by Certbot
listen 443 ssl; # managed by Certbot
ssl_certificate /etc/letsencrypt/live/hng.fun/fullchain.pem; # managed by Certbot
ssl_certificate_key /etc/letsencrypt/live/hng.fun/privkey.pem; # managed by Certbot
include /etc/letsencrypt/options-ssl-nginx.conf; # managed by Certbot
ssl_dhparam /etc/letsencrypt/ssl-dhparams.pem; # managed by Certbot
}
Save the file and quit your editor. Then, verify the syntax of your configuration edits.
$ sudo nginx -tIf you get any errors, reopen the file and check for typos, then test it again.
Once your configuration’s syntax is correct, reload Nginx to load the new configuration.
$ sudo systemctl reload nginxAfter a successful restart, its time to secure nginx, certbot comes handy here, below is required.
A fully registered domain name (hng.fun www.hng.fun).
Step 1 — Installing Certbot
The first step to using Let’s Encrypt to obtain an SSL certificate is to install the Certbot software on the server.
Certbot is in very active development, so the Certbot packages provided by Ubuntu tend to be outdated. However, the Certbot developers maintain a Ubuntu software repository with up-to-date versions, so we’ll use that repository instead.
First, add the repository.
$ sudo add-apt-repository ppa:certbot/certbotYou’ll need to press ENTER to accept. Then, update the package list to pick up the new repository’s package information.
$ sudo apt-get updateAnd finally, install Certbot’s Nginx package with apt-get.
$ sudo apt-get install python-certbot-nginxCertbot is now ready to use, but in order for it to configure SSL for Nginx, we need to verify some of Nginx’s configuration.
Step 2 — Allowing HTTPS Through the Firewall
If you have the ufw firewall enabled, as recommended by the prerequisite guides, you’ll need to adjust the settings to allow for HTTPS traffic. Luckily, Nginx registers a few profiles with ufw upon installation.
You can see the current setting by typing:
$ sudo ufw statusIt will probably look like this, meaning that only HTTP traffic is allowed to the web server:
Output
Status: active
To Action From
 — — — — — —
OpenSSH ALLOW Anywhere
Nginx HTTP ALLOW Anywhere
OpenSSH (v6) ALLOW Anywhere (v6)
Nginx HTTP (v6) ALLOW Anywhere (v6)
To additionally let in HTTPS traffic, we can allow the Nginx Full profile and then delete the redundant Nginx HTTP profile allowance:
$ sudo ufw allow 'Nginx Full'
$ sudo ufw delete allow ‘Nginx HTTP’
Your status should look like this now:
$ sudo ufw status
Output
Status: active
To Action From
 — — — — — —
OpenSSH ALLOW Anywhere
Nginx Full ALLOW Anywhere
OpenSSH (v6) ALLOW Anywhere (v6)
Nginx Full (v6) ALLOW Anywhere (v6)
We’re now ready to run Certbot and fetch our certificates.
Step 3 — Obtaining an SSL Certificate
Certbot provides a variety of ways to obtain SSL certificates, through various plugins. The Nginx plugin will take care of reconfiguring Nginx and reloading the config whenever necessary:
$ sudo certbot -nginx -d hng.fun -d www.hng.funThis runs certbot with the — nginx plugin, using -d to specify the names we’d like the certificate to be valid for.
If this is your first time running certbot, you will be prompted to enter an email address and agree to the terms of service. After doing so, certbot will communicate with the Let’s Encrypt server, then run a challenge to verify that you control the domain you’re requesting a certificate for.
If that’s successful, certbot will ask how you’d like to configure your HTTPS settings.
Please choose whether or not to redirect HTTP traffic to HTTPS, removing HTTP access.
 — — — — — — — — — — — — — — — — — — — — — — — — — — — — — — — — — — — — — — — -
1: No redirect — Make no further changes to the webserver configuration.
2: Redirect — Make all requests redirect to secure HTTPS access. Choose this for new sites, or if you’re confident your site works on HTTPS. You can undo this change by editing your web server’s configuration.
 — — — — — — — — — — — — — — — — — — — — — — — — — — — — — — — — — — — — — — — -
Select the appropriate number [1–2] then [enter] (press ‘c’ to cancel):
Select your choice then hit ENTER. The configuration will be updated, and Nginx will reload to pick up the new settings. certbot will wrap up with a message telling you the process was successful and where your certificates are stored:
IMPORTANT NOTES:

- Congratulations! Your certificate and chain have been saved at /etc/letsencrypt/live/example.com/fullchain.pem. Your cert will expire on 2017–10–23. To obtain a new or tweaked version of this certificate in the future, simply run certbot again with the “certonly” option. To non-interactively renew *all* of your certificates, run “certbot renew”

- Your account credentials have been saved in your Certbot configuration directory at /etc/letsencrypt. You should make a secure backup of this folder now. This configuration directory will also contain certificates and private keys obtained by Certbot so making regular backups of this folder is ideal.

- If you like Certbot, please consider supporting our work by:
Donating to ISRG / Let’s Encrypt: https://letsencrypt.org/donate
Donating to EFF: https://eff.org/donate-le
Your certificates are downloaded, installed, and loaded. Try reloading your website using https:// and notice your browser’s security indicator. It should indicate that the site is properly secured, usually with a green lock icon. If you test your server using the SSL Labs Server Test, it will get an A grade.
Let’s finish by testing the renewal process.
Step 4— Verifying Certbot Auto-Renewal
Let’s Encrypt’s certificates are only valid for ninety days. This is to encourage users to automate their certificate renewal process. The certbot package we installed takes care of this for us by running ‘certbot renew’ twice a day via a systemd timer. On non-systemd distributions, this functionality is provided by a script placed in /etc/cron.d. This task runs twice a day and will renew any certificate that’s within thirty days of expiration.
To test the renewal process, you can do a dry run with certbot:
$ sudo certbot renew -dry-runIf you see no errors, you’re all set. When necessary, Certbot will renew your certificates and reload Nginx to pick up the changes. If the automated renewal process ever fails, Let’s Encrypt will send a message to the email you specified, warning you when your certificate is about to expire.
Backing up your Database and Repos
We will be keeping two days backup of both our database and repos.
As a superuser run
# crontab -e
01 00 * * * sh /var/scripts/hngdailybackup.sh
20 00 * * * sh /var/scripts/mysqldailybackup.sh
save and create below after
vim /var/scripts/hngdailybackup.sh

//contents of hngdailybackup.sh

#!/bin/bash
TIME=date +%b-%d-%y
FILENAME=$TIME.tar.gz
SRCDIR=/var/www/HNGFun
DESDIR=/var/backups/HNGFun
tar -cpzf $DESDIR/$FILENAME $SRCDIR
YESTERDAY=date — date=”2 days ago” +%b-%d-%y
cd /var/backups/HNGFun/
rm -rf $YESTERDAY*
As superuser run below, to create directories to store the generated backups
$ mkdir /var/backups/HNGFunTRAVIS SETUP
Travis CI comes in two halves. https://travis-ci.org/ is for free Public and Open Source repositories on Github and https://travis-ci.com/ is for Private repositories on Github.
So for what we are doing, we are using a public repository due to the amount of people that are to commit to the repository and there we go to https://travis-ci.org/ and link it to our Github Account.
Then you will be directed to sign in with your Github Account, once you have signed into Github and allowed application access, then you will be redirected to the Travis CI dashboard that should look like this when you have added a few repositories to it:

It will be responsible for testing our PHP applications and will build and test every branch and commit unless you tell it otherwise. If our test passes we should have an email notifying us of the successful build

You can view the history of our builds here.
Here is a sample of our .travis.yml file
# sudo is needed to run some service restart below
sudo: required
# to enable travis to prepare an environment specifically for php
language: php
# specify the php version
php:
 — ‘7.0’
# database service you would prefer to use in the environment
services:
 — mysql
# saving of downloaded files for use in next build
cache:
 apt: true
 directories:
 — vendor
 — $HOME/.composer/cache/files
addons:
 apt:
 packages:
 — php5-fpm
 — php5-mysql
 — nginx
hosts:
 — localhost
 — Internship4
before_install:
 — export PATH=vendor/bin:$PATH
 — travis_retry composer self-update
 — composer install
after_success:
- chmod +x ./push.sh
- ./push.sh
before_script:
 — mysql -e “CREATE DATABASE IF NOT EXISTS hng;” -u root
 — mysql -e “CREATE USER ‘hng’@’localhost’ IDENTIFIED BY ‘hng’;” -u root
 — mysql -e “GRANT ALL PRIVILEGES ON hng.* TO ‘hng’@’localhost’;” -u root
 — mysql -e “FLUSH PRIVILEGES;” -u root
 — sudo service php5-fpm restart
 — sudo service nginx restart
 — chmod +x ./conf-maker.sh
 — ./conf-maker.sh
script:
 — mysql -e “DROP DATABASE hng;” -u root
 — mysql -e “CREATE DATABASE IF NOT EXISTS hng;” -u root
 — mysql -e “GRANT ALL PRIVILEGES ON hng.* TO ‘hng’@’localhost’;” -u root
 — mysql -e “FLUSH PRIVILEGES;” -u root
 — ./vendor/bin/phpunit
So when a build is successful, it runs a script called “push.sh” and it is included in the travis.yml config file. The first command is to grant execution privileges to the script and the second is to run it.
after_success:
 - chmod +x ./push.sh
 - ./push.sh
Here is our push scripting and what it entails.
#!/bin/bash
# add the commit info to the commit message
rev=$(git rev-parse — short HEAD)
# sets an email for the git
git config — global user.email “[email protected]”
# sets a username for the git
git config — global user.name “Travis CI”
# makes a git clone of the master branch
git clone -b master https://bantrain:${AUTOBUILD_TOKEN}@github.com/HNGInternship/HNGFun master
# makes a git clone of the prod branch
git clone -b prod https://bantrain:${AUTOBUILD_TOKEN}@github.com/HNGInternship/HNGFun prod
# auto approves the coping of the profiles folder to the prod folder
yes | cp -rf master/profiles/* prod/profiles/
# auto approves the coping of the answers files to the prod folder
yes | cp -rf master/answer* prod/
# changes directory
cd prod
# adds all files in the current folder
git add .
# adds a commit message
git commit -m “committed at ${rev} [ci skip]”
# pushes to the prod branch
git push origin prod
# show done in the travis build console
echo -e "Done"
TESTING VIA PHP UNIT
The practices of DevOps include continuously testing codes at each commit to ensuring that any recent code changes do not break the build. The testing framework used for this application is PHPUnit.
The first concern that had to be sorted out was figuring out what to test to ensure that the application does not break.
After careful observance, the most common thing that broke the application was the constant modification of the config.php file which held database connection parameters, as well as the db.php file which used the parameters contained in the config.php file to create a database connection object.
The approach taken to write the test was this:
At each commit, we check whether the db.php file still exists. This is important because without this file, the major parts of the database would not be able to connect to the database.
If the db.php file is found, then we proceed to check whether a config.php file located in a directory immediately outside the root directory is referenced or “require”d within it. This is because our observation revealed that contributors try modifying the location of the config.php file used when they encounter difficulties connecting to their databases on their local development machines. To prevent the test from being affected by any wrong parameters which may have been introduced by a contributor after pushing his or her code to the remote repositiory, a bash script named conf_maker.sh was written. The function of this script is to create a config.php file with the correct database configuration parameters in the correct directory on the Travis CI server . Here is what conf_maker.sh contains:
#! /bin/sh
rm ../config.php
rm config.php
touch config.php
cat <<EOT >> config.php
<?php
/*
* Please, DO NOT EDIT THIS FILE
*/
define (‘DB_USER’, “hng”);
define (‘DB_PASSWORD’, “hng”);
define (‘DB_DATABASE’, “hng”);
define (‘DB_HOST’, “localhost”);
?>
EOT

mv -f config.php ../
The PHP test was written in the DatabaseTest.php file in the tests folder and contains:
<?php
class DatabaseTest extends PHPUnit_Framework_TestCase
{
public function testIfConnObjectIsSet()
{
$file_exists = file_exists(“db.php”);
$this->assertTrue($file_exists);
$fcontents = htmlentities(file_get_contents(“db.php”));
$contains = stripos($fcontents, “../config.php”);
$this->assertTrue($contains !== false);
if($contains !== false){
require “db.php”;
$this->assertNotNull($conn);
}
}
}
?>
Also part of the testing process is the phpunit.xml file which contains some configurations, an important part being:
<testsuites>
<testsuite name=”Package Test Suite”>
<directory suffix=”.php”>./tests</directory>
</testsuite>
</testsuites>
which specifies the directory which PHPUnit is to check for the test files.
When Travis CI runs the tests and they pass, it proceeds to begin the auto-deployment process. If the test fails, the auto-deployment process is halted.
CONFIGURING AUTO-DEPLOY
We have to get our Git and our Keys ready for Github
First thing first, we have to check our git and install it:
$ sudo apt update
$ sudo apt install git
Then to check if git has been installed properly:
$ git — versionThen we have to configure git for the automated user:
$ git config — global user.name “[Travis CI]”
$ git config — global user.email “[your github email]”
Then we created ssh for the current username:
$ ssh-keygen -t rsaThen go to Github.com and get the repository ready:
We add our keys to the deploy part of our Repository settings:
- Add the SSH key to the repo
- https://github.com/[githubname]/[repo]/settings/keys
- Create a new key and name it appropriately
- Paste the deploy key you generated on the server and save
Adding these keys allows our server to talk to git without a password.
Then back to the server and ssh in, and cd into our folder:
$ ssh username@localhost
$ mkdir /var/www/HNGFun
$ sudo chown -R username:username /var/www/HNGFun
$ git clone [email protected]/HNGInternship/HNGFun.git /var/www/HNGFun
$ cd /var/www/HNGFun
Then we set up a webhook, a webhook is a URL that Github will hit when a repository is updated.
So we will create a deployment script that Github will hit and the script will run. This script when running will pull in from the git and update the codebase on the server.
Creating the deployment script:
$ cd /var/www/HNGFun
$ touch deploy.php
$ sudo apt install nano
$ nano deploy.php
Then paste the code below
<?php
/**
* GIT DEPLOYMENT SCRIPT
*
* Used for automatically deploying websites via GitHub
*
*/
// array of commands
$commands = array(
‘echo $PWD’,
‘whoami’,
‘git pull’,
‘git status’,
‘git submodule sync’,
‘git submodule update’,
‘git submodule status’,
);
// exec commands
$output = ‘’;
foreach($commands AS $command){
$tmp = shell_exec($command);
$output .= “<span style=”color: #6BE234;”>
</span><span style=”color: #729FCF;”>{$command}n</span><br />”;
$output .= htmlentities(trim($tmp)) . “n<br /><br />”;
}
?>
<!DOCTYPE HTML>
<html lang=”en-US”>
<head>
<meta charset=”UTF-8">
<title>GIT DEPLOYMENT SCRIPT</title>
</head>
<body style="background-color: #000000; color: #FFFFFF; font-weight: bold; padding: 0 10px;">
<div style=”width:700px”>
<div style=”float:left;width:350px;”>
<p style=”color:white;”>Git Deployment Script</p>
<?php echo $output; ?>
</div>
</div>
</body>
</html>
$ git add deploy.php
$ git commit -m 'Adding the git deployment script'
$ git pushNow, in your GitHub.com repo settings, we will set up the webhook which will automatically call the deployed URL, thus triggering a PULL request from the server to the origin.
- Go to
- Click Add webhook to add a service hook
- Enter the URL to your deployment script as the Payload URL — http://localhost.com/deploy.php
- Leave the rest of the options as default. Make sure ‘Active’ is checked on.
- Click Add webhook
SUMMARY
As you can see, implementing a CI/CD structure and starting with a DevOps mindset is truly not a herculean task. ?
It does not take forever to set up, changes are reversible and reflect immediately on the live server.
Have you ever imagined a CI/CD setup for working with databases?
We look forward to seeing that happen.

Lastly, huge thanks to Wisdom Anthony, Gabriel Umoh, Justine Philip, Akinduko Olugbenga and Chigozie Ekwonu.
For the assists and saves. ?
Leave a Reply